PROJECT: ROS SLAM Navigation Robot with Mecanum Wheels - Yahboom ROSMASTER X3
I have been dabbling with various ROS robots over the years. Recently, I have been looking for a ROS2 Robot kit (so I don’t have to build a robot from scratch) with mecanum wheels that I can tinker and learn more about the SLAM navigation capabilities in the ROS2. Of course, I needed this thing to be over engineered by adding a cheap Lidar, depth camera, run from various processors including Jetson Nano and Raspberry Pi4B as well as being small form factored. Oh, also good documentation and lots of example codes so I don’t have to start from scratch.
Well.. to my surprise, I found one that was exactly what I was looking for!
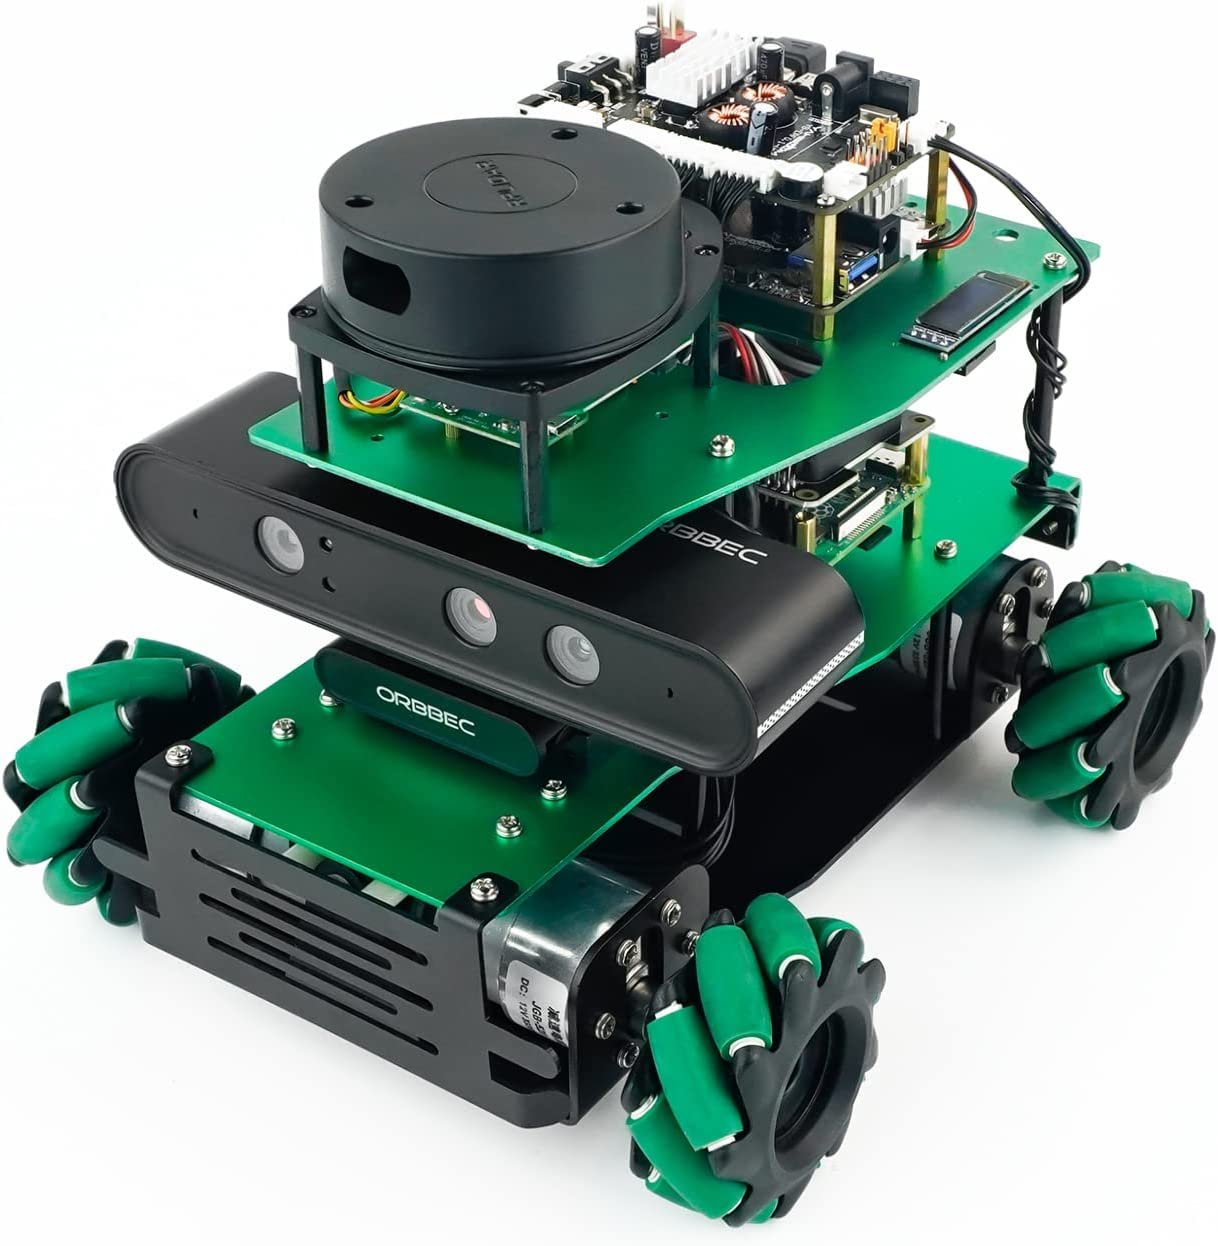
Yahboom ROS Master X3
Robot Repo here - http://www.yahboom.net/study/ROSMASTER-X3
Over view video here - https://www.youtube.com/watch?v=_fsbd6Urcek
Installation video here - https://www.youtube.com/watch?v=JVqzgYPJW0M
Example Training Video (ROS Basic in Chinese with English subtitle) - https://www.youtube.com/watch?v=YcU-VxIWSkE
Following are some of the key capabilities that stood out for me:
Multiple Processor Support - Although the Jetson TX2-NX is recommended as the best cost per performance option, Jetson Nano or Raspberry Pi 4B is also supported. Unlike many people who is looking for the best performance option, I needed it to be at the edge of failure to really test and push the behavior of the algorithms at its peak. It seems like I can swap between the Jetson TX2-NX and RaspPi4B to compare the difference in performance as the RaspPi peaks its limit. Also note that the some components are different between which processor kit you buy - you can purchase the separate components at the Yahboom site.
Small Form Factor with Lots of Capabilities - This kit seems to include just about everything you need to get started with ROS2 for SLAM navigation. It includes mecanum wheels for omni-directional movement, lidar and a depth camera used for 3D point crude and SLAM mapping navigation, voice interactive module, Computer Vision support, 9 axis attitude sensor, and most importantly ROS2 support.
Good Documentation for Learning - Good English documentation and code examples. They also have training videos available (the videos are in Chinese with English subtitle). It is very important to remember that such kit is at the end of the day, a toy that is designed to help learning. This means it will fail to work more times than it works like in the video - a key part of learning to be a great engineer is to overcome the failure and keep moving forward! (or at least, I try to tell myself that so I don’t go crazy with too much frustration).
My ultimate object for this mecanum wheel rover robot project is to build 3 to 4 full size robots (3x3 feet or 1x1 meters) that will navigate on the factory floor to be able to conduct navigation and work cooperatively in a group. It seems like this robot already does the things I needed in a full size robot, so this will be a nice learning tool that I can tote around helping me learn the capabilities of the ROS2 navigation, use of simulation tools, and the software codes that I can further develop which will be transferable over to the full size robot. I am sure there will be plenty of unexpected surprises and hidden pitfalls that will crush my will - as always this engineering and it is never easy. However, this is a good start for me & may be a good educational robot for people to jump start.
Planned Next Steps
Well.. this is a ROS2 learning project for me. I will capture lessons learned, configuration tips and tricks that will help me in a full robot. Also collection of codes that I collect and build along the way.
PROJECT: Dogzilla the AI Robot Dog - Yahboom Smart Mechanical Dog
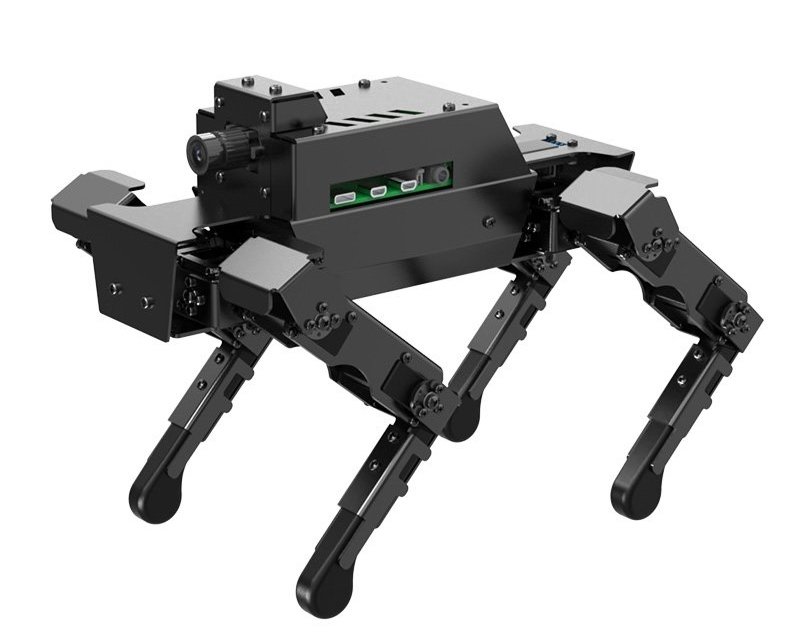
Yahboom’s AI Robot Dog - DOGZILLA S1
I have been trying to find a good robot dog platform for a while to start my new project. Just like the hexapod (6 legged) and the quadruped (4 legged) robot projects, my robot dog project focuses on the evolution of a robot’s walking posture or “gait”. As such, I needed a solid mechanical platform with a good posture representation of a four legged animal such as a dog. I tried several different platforms including 3d printed options, but I did not find anything that met my needs.
During the lunch time web browsing session today, I found one that I though provided a good starting point for me - Yahboom’s Dogzilla Robot Dog.
Following are some reference for the robot:
Dogzilla Repo - http://www.yahboom.net/study/DOGZILLA-S1
Overview video - https://www.youtube.com/watch?v=JSU1tdqNJ30
Installation video - https://www.youtube.com/watch?v=8b56pwhilv4
Following are some of the key capabilities that stood out for me:
Processors - Raspberry Pi as a main controller for heavy lifting (e.g. computer vision) while the STM32 as a co-processor for driving sensors and movement motor/servos. One upgrade option to consider is to move up to a bit faster processors like JetsonNano in lieu of the RaspPi4B.
Computer Vision - Equipped with a camera module and the OpenCV to achieve some basic “AI vision” functionalities such as face recognition, QR code identification, color identification, and target tracking. One upgrade path is to add a depth camera such as Oak-D-Lite camera.
Accurate Joint Representation - Although many of the quadruped (4 legged) robots have 3 DOF (3 degrees of freedom/3 joints), the position of the servos can have a great impact on the representation of a more accurate walking motion of a 4 legged animal/dog. As you can see in the videos, the Dogzilla have joints/servos in the elbow, shoulder, and the hip that can represent more accurate walking gait of a mechanical dog. Also, the 12 (4 x 3 DOF) joints are represented by 12 bus servos which makes the wiring simpler by daisy chaining from one servo to another.
Kinematics Motion Planning - The joint movement is based on the inverse kinematics. This allows for the omnidirectional motion that is smoother and natural without jigged “robot-like” movements. You can see the robot’s movement in the video that shows forward, backward, left, and right movements & the multi-dimensional attitude control to achieve a stable posture during the various walking gaits. This was probably the biggest selling point for my needs.
Frame - Metallic frame allows the robot to have a slimmer body shape while providing strength and keeping the overall weight down (compared to using plastic body). Also, it allows some modification to the body without significantly weakening the overall structural integrity.
Planned Next Steps
When the robot arrives, take some internal photos of the robot especially the layout of the legs and joints.
Identify major walking gaits available for the robot out of the box.
PROJECT: Neato BotVac Robot - How to install ROS2 Foxy + 64bit Linux Server on a Raspberry Pi4 (and not cry)

A friendly names like a Raspberry Pi, BotVac…. for a moment, I forgot I was still dealing with technology.
As I started the ROS2 project, my objective was to quickly install the ROS2 and get to learning to tools. However, with the various obstacles, I’ve decided to write out the steps and things that will certainly stall me in the future. Following are some of the instructions that I found that explains steps to install the ROS2 on RPi4.
Following are the steps that I have used to install 64bit Linux Ubuntu Server 20.04 + ROS2 on a Raspberry Pi4 8gb model - for use with the Neato BotVac D5 Connect Robot
Download & burn Raspberry Pi4 image to a SD card - 64-bit Linux Server 20.04 - Done
Images are here - https://ubuntu.com/download/raspberry-pi
I used 32gb class 10 SD card - perhaps I may move to 64gb later, but I like 32gb as I can make a quick backup copy of the card or retrieve from a backup around 30min.
Install instructions
Configure Ubuntu 64-bit Linux Server - Done
Default Ubuntu ID & PW: ubuntu
Setup wifi on Ubuntu/RPi4: https://itsfoss.com/connect-wifi-terminal-ubuntu/
caution: when you nano to modify yaml fie, make sure you use 4 spacebar (using tab key will cause error).
only thing I had to do was to modify the yaml file. In my case I had to do the “sudo netplan generate” & “sudo netplan generate” after I added the wifi info on the yaml file.
Tested and made sure I can just power up the RPi4 and remote in headless from my laptop - a good place to make a backup image of the SD card
command used from my Mac - ssh ubuntu@192.168.1.xxx (192.168.1.xxx is the IP address of your RPi4)
if you are retrieving from a backup image and try to connect headless, you may get “warning: remote host identification has changed” message. Use the command here to reset
ssh-keygen -R 192.168.1.xxx <— IP address of the RPi4
Install ROS2 and required packages on the Linux image - Done
Referenced following resources
You may have to run the script below. To learn more about the ROS GPG Key Expiration Incident - ROS Discourse link HERE
sudo curl -sSL https://raw.githubusercontent.com/ros/rosdistro/master/ros.key -o /usr/share/keyrings/ros-archive-keyring.gpg
Update and Setup Locale
sudo apt update && sudo apt install locales
sudo locale-gen en_US en_US.UTF-8
sudo update-locale LC_ALL=en_US.UTF-8 LANG=en_US.UTF-8
export LANG=en_US.UTF-8
Setup Sources
sudo apt update && sudo apt install curl gnupg2 lsb-release
sudo curl -s https://raw.githubusercontent.com/ros/rosdistro/master/ros.asc | sudo apt-key add -
sudo sh -c 'echo "deb [arch=$(dpkg --print-architecture)] http://packages.ros.org/ros2/ubuntu $(lsb_release -cs) main" > /etc/apt/sources.list.d/ros2-latest.list'
Install ROS2 Core Packages - base package includes many other packages
sudo apt update
sudo apt install ros-foxy-ros-base
Install Colcon (Build Tool)
sudo apt install python3-colcon-common-extensions
Auto-completion for ROS2 command line tools (optional, but recommended)
sudo apt install python3-argcomplete
Configure Your Environment for ROS2 & Build Test - Done
Add instruction to source your ROS2 environment on the bashrc file
echo "source /opt/ros/foxy/setup.bash" >> ~/.bashrc
To conduct a build test, we are creating a workspace folder called “robot_ws”. You can change it to any folder name you want. Following commands test and confirm the install - you will see following folders created: build, install, log, src
Note: your current directory/pwd is /home/ubuntu.
mkdir -p ~/robot_ws/src
cd ~/robot_ws/
colcon build --symlink-install
Install and Configure the BotVac - Done
Install required packages
sudo apt install build-essential
sudo apt install ros-foxy-xacro
sudo apt install python3-rosdep2
Clone packages for the BotVac & Build
cd ~/robot_ws/src
git clone https://github.com/jnugen/botvac_node.git
git clone https://github.com/jnugen/neato_robot.git
git clone https://github.com/kobuki-base/cmd_vel_mux.git
git clone https://github.com/kobuki-base/velocity_smoother.git
git clone -b foxy-devel https://github.com/ros-planning/navigation2.git
cd ..
rosdep update
rosdep install --from-paths src --ignore-src -r -y
colcon build (note: the build time for me was around 49min)
source install/setup.bash
Launch ROS2 on RPi4 (Note: RPi4 will have to be connected to the BotVac via micro USB) - DONE
ros2 launch botvac_node botvac_base_only.launch.py
If you see a screen like below with no error, you are good to go. Congrats!

Troubleshooting ideas
If you are like me, things will certainly not go right the first time or the second or the third time. Following are some of the issues I had and the way I fixed it.
This is really more to help me reference as I run into issue in the future when I reinstall ROS2. Hopefully, some of workaround here can help you troubleshoot your issue as well.

ERROR: Could not access serial port: /dev/ttyACM0” & ERROR: Could not connect to Botvac
ISSUE: RPi4/ROS2 is not seeing the BotVac robot - if you see the error similar to the screenshot above (Error: “Could not access serial port: /dev/ttyACM0” and/or “Could not connect to Botvac”)
When the Neato robot is properly connected, it will show up as “ttyACM0” in the /dev directory. If it does not show up, try the following
Unplug the micro usb cable and plug back in to see if it will appear. You can also try rebooting the RPi as well.
Try to change the micro usb cable. Some of the cheap cables are rates for charging only (no support for data transmission) so make sure you are using a proper cable.
This is the one that bit me. I used the shortest cable I had, but that caused the problem.
ISSUE: The Linux OS installed fine, but start getting bunch of error message while trying to install ROS2.
There is a known issue that was due to ROS GPG key. Reference HERE. Use the short script they have provided for ROS2. In my case, that fixed the majority of the issues while trying to install ROS2.
ISSUE: Every thing worked and tested fine. However, a few days later, I start receiving error when trying to launch the ROS2/Neato script - ros2 launch botvac_node botvac_base_only.launch.py
Try reinstalling the steps in Step #5 - Clone packages for the BotVac & Build.
I had to do this a few times. I suspect it has to do with how I ended the session on the previous day. I am not sure yet what I am doing wrong, but running the steps from the Clone packages on the #5 seems to fix the problem.
Planned Next Steps
Test drive the robot headless (remotely) from a separate ROS2 computer. Since I only installed the most essential applications on the RPi, I will have to use the laptop/PC with full suite of ROS2 to use navigation functions. Since I am new to these tools in ROS2, I am going to take time learning all about the tool and get started.
Also, I have to learn about the robot both mechanically as well as its software APIs. All the information I gather will be included in the next project update.
This is for my personal use - Reference material while I am studying ROS2.
Neato BotVac
For reference
Neato D5 Review - https://smartrobotreviews.com/buying-guide/neato-botvac-d5-connected.html
Neato Pi Hack - https://www.robotshop.com/community/robots/show/neato-robot-with-raspberry-pi-hack
Hackaday - https://hackaday.com/tag/neato/
Servo Magazine - https://www.servomagazine.com/magazine/article/neato-ros-robot-navigation
questions & discussions: http://www.robotreviews.com/
Nav2 - https://roscon.ros.org/2019/talks/roscon2019_navigation2_overview_final.pdf
——-
research workaround
https://www.youtube.com/watch?v=fxRWY0j3p_U
https://www.youtube.com/watch?v=AmuLiA840fA
Choosing between the ROS 1 and ROS 2 - For Dummies Guide for choosing Robot OS

Once you decide to learn ROS (Robot Operating System), next step is to choose between the ROS 1 or ROS 2. There are many resources on the internet that highlights the difference between the ROS1 and ROS2. Following is an excellent article that compares the difference between the two using infographics. As you can see in the article, both ROS1 and ROS2 serves as an excellent platform which contains re-usable tools that will help you develop your robotics projects. They are both backed by a very active and passionate community of roboticists all over the world.
“ROS 2 vs. ROS 1 Which One Is Better For Me?” - https://www.theconstructsim.com/infographic-ros-1-vs-ros-2-one-better-2/
Before we continue, let me make it clear that the ROS2 is not simply a next version of ROS1 - ROS2 is very different than ROS1. Even thought I would agree that the ROS2 includes very important improvements over ROS1, the difference between the two often feels like they are two different OS like Windows OS vs Mac OS. At times, your experiences in ROS1 will hinder your learning of the ROS2. So, the important question is should you start with the ROS1 or ROS2 as a newcomer to the RobotOS. The natural tendency is to start with the later version which is the ROS2 simply because you want to avoid having to learn an older platform which will be deprecated soon. The decision is not that simple.
Consideration for starting with the ROS2 - Engineering is hard and the robotics is harder. While pursuing a robotics project, there will be many times that you will run into problems that you need to research on the internet for and even seek help from the ROS community. As of this writing, mid 2020, the resources and code examples in ROS2 is still rare compared to the more established ROS1. Also, receiving help from the ROS community maybe limited to certain popular topics due to the people in the ROS community still new to the ROS2. The viable reason to start with the ROS2 first is, if it offers the key functionality that you must have in your project such as security requirement, language or platform support, and number of communication nodes required etc. Keep in mind, the road to the ROS2 will give you more capabilities at the end, but the road will certainly be slower and tougher at least for now.
Consideration for starting with the ROS1 - Many people who have some experience in the ROS1 and have dabbled on the ROS2 will likely recommend starting with the ROS1. This is due to the vast amount of resources that you can easily find and reference for your project. You will also be able to find learning materials like books, on-line courses, tutorial much easily and cheaper with the ROS1 (please reference my other post on the ROS for a free ebook by Mr. Jason M. O’Kane - https://www.chibots.org/content-how-to-advanced/getting-started-with-the-ros-robotos ). Although starting out with the ROS1 will provide less painful start, you will soon find yourself envious of the capabilities of the ROS2 and regret not starting with the ROS2.
The key to your success is Getting Started - The more you wait and the more you search, you will just end up with more contradicting recommendations. To add to your confusion and frustration, my recommendation is to start with the ROS1 if your objective is to learn ROS. You will enjoy vast amount of free resources on the internet and the support from the ROS community. If you are pursuing a robotics project that must have the capabilities offered by the ROS2, start with the plan in mind that you will have a lot of learning and R&D along the way. Just like the old saying, there is really no secret and the key is to get started and find out the answer yourself. After all, the reality is that you will end up having to learn both, realizing that there was no shortcut.
I will end my post by sharing my previous journey of learning Python back in 2012ish. Coming from the old C/C++ language, everyone said picking up Python was going to be really easy. When I got started, the Python 2 was the old and more established version and the Python 3 was the new and radically improved version very similar to the ROS1 vs. ROS2 today. Thinking that I can skip the Python2, by going straight to the Python3, I got started by buying an only book at the bookstore on Python3 that costed more than my computer (well at least it felt like it). Unlike what I have expected, learning Python for me took much longer than I have initially thought. Also, whenever I try to push my project beyond the basics of the book’s tutorial, I found myself constantly getting stuck with not being able to find much on the internet (also, online communities like StackOverflow was still very new at the time). Also, because of many open source projects were predominantly written in Python2, I found myself spending more time on Python2 rather than Python3 unless it was for my own project written in 3. Needless to say, I eventually got pretty good on Python, but perhaps the time and pain would have been less if I focused on Python2 first rather than having to learn both Python2 and 3 unintentionally in parallel. As in life, I think there is no shortcut in technology. The key is to get started - You will eventually become a master as long as you don’t give up! I promise.
Getting Started with the ROS (Robot OS)

TurtleBot3 by Robotis - ROS
Among the roboticists, both hobbyists and professionals alike, the ROS (Robot Operating System, https://www.ros.org/) is rapidly becoming one of the major robotics platform for building and driving robots. Some people will argue that the ROS is not exactly an Operating System, as it is a platform or a collection of tools that runs on a Linux OS. Despite of how you categorize it, the true power of ROS comes from the active ROS community and the community developed open-source softwares and middle-wares that are re-usable.
Before the ROS, a roboticist would spend countless hours reinventing the wheel each time they start a new project. One of my biggest frustration coming from the software engineering, is the lack of standardized conventions for driving hardware functionalities. To build a simple 5 axis manipulator aka Robot Arm, I find myself spending considerable amount of time and effort learning about the individual hardware components and its embedded softwares. As the robotics require advanced skills in multiple domains including mechanical engineering, electrical engineering, and software engineering (and nowadays Machine Learning, Computer Vision etc.), it is most likely that a robotics project will get stalled before you get to the point where you start thinking about programming the robot to move. Needless to say, that the small research project involving inverse kinematics of a robot arm, is not a small project due to the hidden obstacles and barriers coming from the multiple domains of expertise that are beyond most of us.
ROS as a meta-operating system provides process management and hardware abstraction. This means, you can re-use the thousands of hardware and software components that are already built by the ROS community and focus in the area of your expertise. Think of it as getting access to various Arduino libraries that extends the functionalities of your sensors without have to write it yourself. ROS is especially helpful for driving advanced components and/or very specific use cases. I think the ROS provides the best opportunity to leverage what other have already built and to share what you have built with the others.
There are lots of resources available on the internet and the bookstores. One of the resources I would recommend starting out is the “A Gentle Introduction to ROS” by Mr. Jason M. O’Kane - https://www.cse.sc.edu/~jokane/agitr/ . The book is free for individual use and is highly recommended by the ROS community. Why not give ROS a try? It will certainly be a great tool to have in your robotics toolkit.